Showing posts with label recipe. Show all posts
Sunday, May 31, 2015

Breakfast Cookies (yes, really!)

I am not sure how I'm going to make it until I have this baby in September.

She feels so high, I can already barely breathe well. If I sit down, I feel like I'm suffocating slowly! Girl needs to drop down a little and give me some space in my lungs...

Anyway, a month or so ago, I made the mistake of buying a package of gluten free cookies to have around as the occasional treat for Declan. Let's just say it didn't take him long to figure out they were in the pantry and pretty soon he was standing at the door all day long demanding COOOOOKIE. (He makes the cutest little duck face to form the 'ooooo' sound...like a mini Cookie Monster)

Someone posted this recipe and I had to give it a try. I have to admit they are really good, and my kids have already eaten half the batch. Oops.

Sure, you may not want to make this a regular breakfast but how fun is it to offer a cookie at breakfast and know that the ingredients are pretty darn uh...breakfast-y. And even though they are healthy, you could totally chow on one or two of these for dessert and be just as satisfied.


You'll need:

- 3 large bananas, ripe (peeled, and chunked)
- 1/2 c. creamy natural almond butter
- 1 Tblsp butter (I actually used coconut oil)
- 2 Tblsp honey or maple syrup
- 1 tsp vanilla extract
- 2.5 c. oats  (We used Bob's Mill gluten free)
- 1 tsp baking powder
- 1/4 tsp ground cinnamon
- 1/4 tsp salt
Add ins:
1/2 c. dark chocolate chips/dried cherries/dried cranberries/nuts, coconut flakes, etc
(We used about 1/4 c. dark chocolate chips, 1/4 c. dried cranberries and pecan pieces)

Mash bananas with a fork, add next 4 ingredients and mix well, until smooth.

Add dry ingredients, stir well and then add your chocolate chips, dried fruit and/or nuts.

Bake at 350 degrees on a parchment lined or oiled cookie sheet for 12-14 minutes. Makes about 2 dozen cookies. (via Self)

I will totally be making these again - maybe throwing in some flax or hemp seeds for even more nutritional benefit.


Get $10 off your first Vitacost order by clicking HERE. 


Wednesday, May 20, 2015

Easy Summer Pops!

Time to lighten up this blog a little bit, eh?

It is getting straight up hot here in the South and that means it's popsicle time!

Beckett is at the age where he wants popsicles now every time we hit the grocery store - and it's hard to find any that aren't full of weird ingredients or food dyes.

If I *am* lucky enough to find a decent brand with ok ingredients, it'll cost me $6 for about 4 of them. You feel me?

I saw this recipe online and knew it was a winner. Easy, healthy and look how pretty - heck, I might even steal a few for my pregnant self this summer while I stick my feet in the baby pool.


Here's what you'll need:

- popsicle molds (obvi)
- coconut water
- fresh fruit (I used raspberries, blueberries and sliced kiwi)

That's it. I love the idea of coconut water - if you get a decent brand, there are some good benefits to it. I cannot stand the taste of it alone, but I knew my kids would love it in popsicle form. We used Harvest Bay brand which you can find on Vitacost for a great price...I used the pineapple flavor, which isn't certified organic but some of their varities are.

Fill your popsicle molds about 3/4 of the way full, add your fruit and freeze!


You can find these popsicle molds on Amazon - I love them. They are really, really great. 

These popsicles are super yummy, nutritious and not full of junk. Just make sure you read the labels of your coconut water! Some of them are deceptive...

My kids loved these. (so did I, really...)
Saturday, March 15, 2014

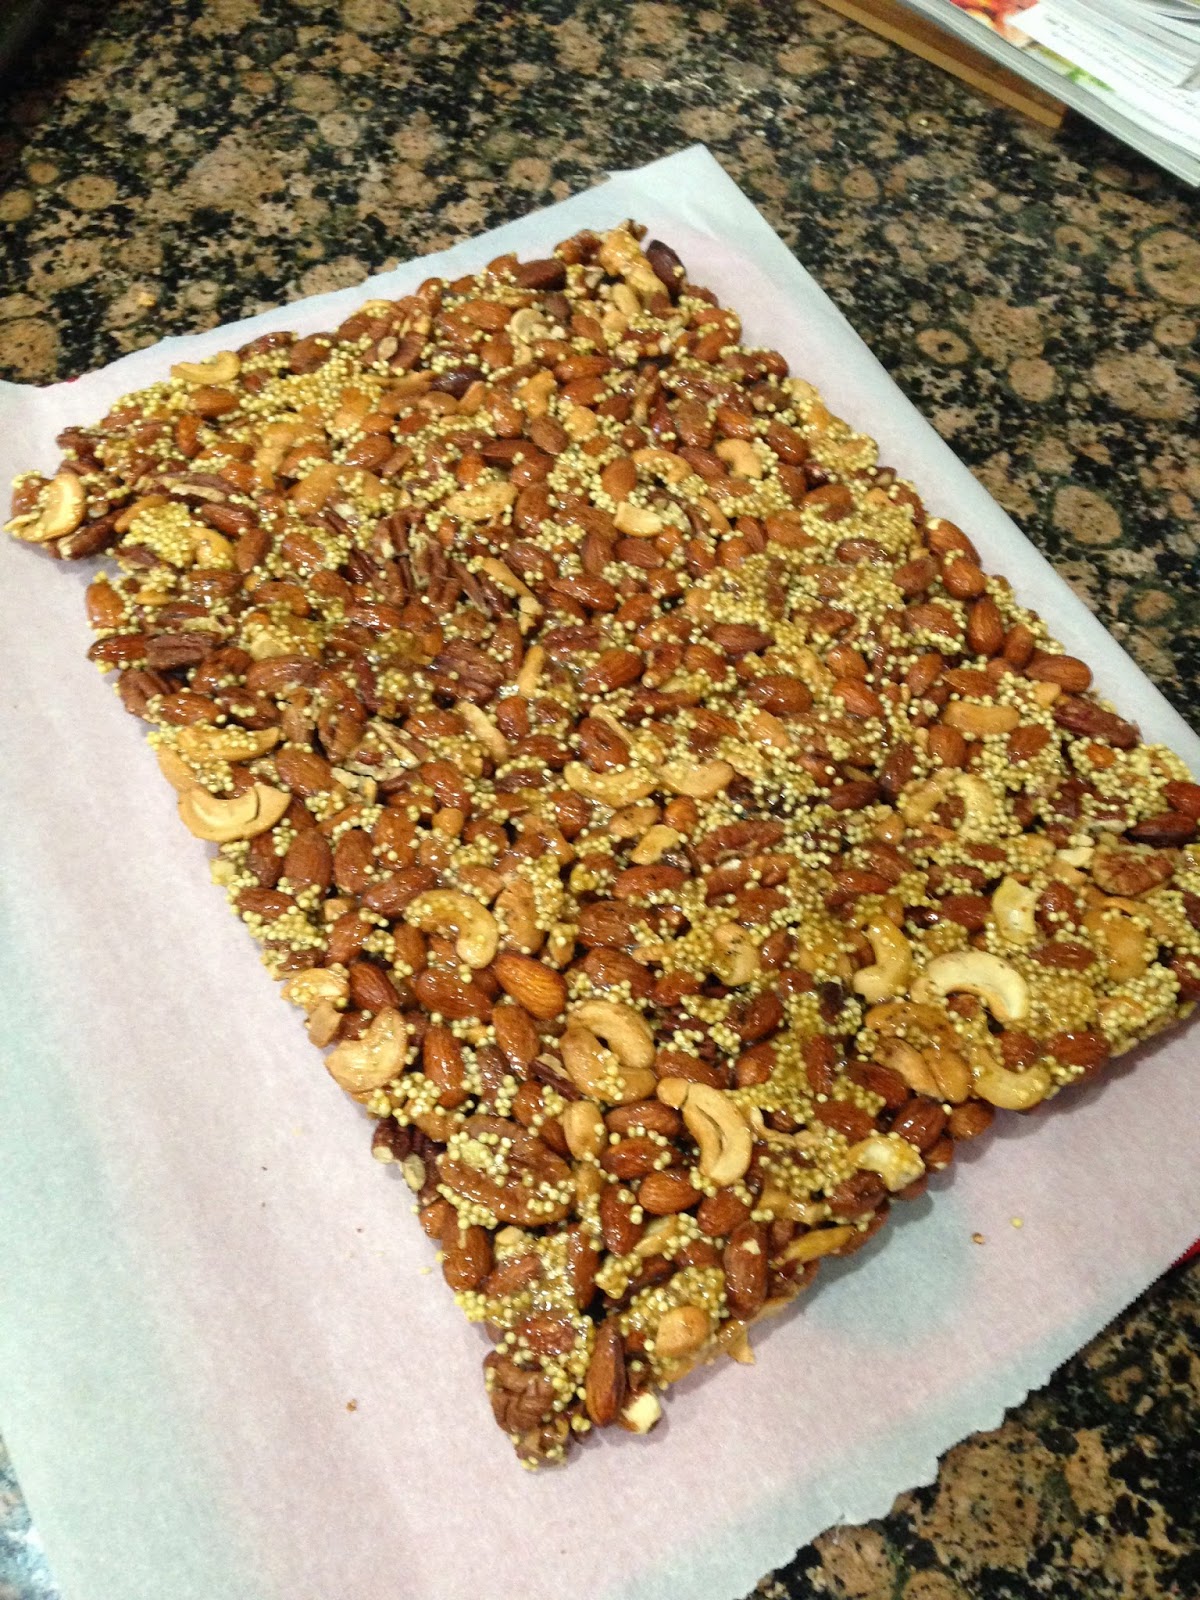
Dark Chocolate Nuts & Sea Salt KIND Bars Recipe

Did you guys know there are people on YouTube that are kind of like bloggers, only they talk on video instead of write?

Ok, yes I know I'm way behind the times. But I just recently discovered some great YouTube vloggers (??) and I am kind of excited about it.

One of them shared a recipe for homemade KIND bars that kind of made me jump up and down. We LOVE all manner of granola, nut, or fruit bars in this house and I almost always have a stash of Lara or Kind bars in the pantry.  The problem is, even buying them in bulk gets pricey. My husband travels a lot for work, and he likes to have some to take with him.

When I saw this recipe on YouTube I knew I needed to try it! I found it a little annoying to cook from a video recipe, so I wrote it down and I'm going to share it with you!  The recipe below is the original - I actually used cashews, pecans and almonds instead of walnuts, peanuts and almonds.

One thing - you WILL need a candy thermometer for this, unless you are a seasoned candy expert and know when your syrup will hit the soft ball stage.  If you have no idea what I just said, definitely use a candy thermometer.

Dark Chocolate, Nuts & Sea Salt KIND Bars
Printable Recipe

- 3/4 c. walnuts
- 3/4 c. peanuts
- 2 c. almonds
- 1 c. dark chocolate chips for melting
- 1 tbslp flax meal
- 1/2 c. millet
- 1/2 c. honey
- 1/3 c. Brown Rice Syrup
- 3/4 tsp salt
- 1 tsp vanilla

Directions:

Roast your walnuts, peanuts and almonds for 10 minutes at 350 degrees.

Spray a mixing bowl and a 9x13 inch cookie sheet with a non-stick spray (I used olive oil)  Add your nuts, the millet and flax meal.  Set aside.

On medium high heat, cook honey, brown rice syrup, vanilla and salt. Stir frequently. Heat until 260 degrees, using a candy thermometer.

Once your syrup reaches 260 degrees, you'll want to work quickly. Pour the syrup into the nut mixture and stir to evenly coat.  Then pour into a greased cookie sheet. You can flatten the nut mixture with the bottom of a greased glass or with wax paper. Once you've flattened the nuts out, let cool for 30 minutes.

After cooled, flip your cookie sheet over to release the mixture - it should come out in a big rectangle. Cut into bars.

Melt your dark chocolate chips with a double broiler or in the microwave in 30 second intervals, stirring until smooth.  Dip the underside/bottom of each bar into the chocolate and put on wax paper to cool. After the bottoms of all the bars are dipped in chocolate, use the leftover to drizzle on top of each bar with a spoon.


You can refrigerate or freeze until the chocolate is hard and then wrap each bar individually in wax paper.  


Enjoy!


Thursday, March 13, 2014

Cherry + Beet Smoothie

I posted a pic the other day on Facebook of my new favorite (ok, second favorite) smoothie recipe and a ton of you have asked for it - because I hadn't really measured things out, I typed out what I *thought* it would be a few times and then I decided I would pay attention to what I was putting in the blender so I could share the correct amounts with you!

I've been seeing a naturopathic doctor to help me rebalance myself after having a bunch o'babies and to effectively take off (and KEEP off) baby weight - she mentioned how much she loved beets in her smoothies and then rattled off a few other ingredients she puts in there as well. We didn't talk about measurements, so this probably varies from what she does but I've been really enjoying it as an alternative to my ALL TIME favorite smoothie (the Glowing Green Smoothie).

A few things to note - beets have a very earthy flavor and while I don't find it overpowering or unpleasant, it is noticeable.  Because I use raw beet, it is a little fibrous but again, I don't mind it. And if you don't have a high powered blender like a Vitamix, you'll probably want to roast your beets first to make it easier.

And as with any smoothie recipe, you may need to tweak it to make it your own.

Anyway, here it is! Enjoy!


Beet Cherry Smoothie

- 1 c. almond milk
- 1/2 c. filtered water
- 1 beet, peeled and chopped (you can start with half if you aren't sure how you'll like the flavor)
- beet greens/stems from one beet (or, you can throw in a handful of other greens)
- 1 c. frozen cherries, whole
- 3/4 c. blueberries
- 1/2 tsp freshly grated ginger
- 1/2 tsp powdered turmeric
- splash of Organic Pure Pineapple Juice (optional)
- 1 Tblsp Garden of Life Organic Chia Seed (optional)
- 1 scoop unflavored Pure Pea Protein Powder (optional)

Blend until smooth!


Saturday, June 15, 2013

jammin'

My friend Jamie and I co-write a blog called The Pinterest Project, where we work through Pinterest one pin at a time and blog about it!

Awhile back she posted a recipe for strawberry jam that used only honey, apple and lemon as ingredients (along with strawberries, of course) and I was dying to try it out.  It's a little bit tough to find jam recipes that don't include a LOT of sugar so this piqued my interest.

After a failed attempt at flea market shopping (more like the world's biggest dollar store...), we headed to a local place called The Peach Stand to see if peaches were in season.  There wasn't much yet in the way of peaches, but we did snatch up some GORGEOUS looking strawberries.


This is a super easy jam, so if you've never canned before, give it a shot.

Check out her original post HERE.

Step 1: rinse and cut berries


Step 2: Add honey, freshly squeezed lemon juice & grated apple


Step 3: Boil and mash


Step 4: Pour jam into sterilized jars and process in a water bath.


Step 5: Listen for those awesome little pops that tell you your jars are sealed!  Mmmm, jam.


Friday, May 24, 2013

Berries, Bread + Wine


So I'm in the process of reading Shauna Niequist's newest book, Bread & Wine.  I actually have all 3 of her books started right now, but this one in particular has grabbed me and I'm just devouring it.  The cover calls it, "a love letter to life around the table with recipes'.  I call it, "God speaking directly to me"

She talks about many different subjects in the book - but there is an overriding theme to the book (so far
- not finished yet!) about community and food.  How memories are made, relationships are strengthened, friendships developed, lives changed around a table or in someone's home.  It's really speaking to me personally - maybe you remember me writing about 'intentional friendships' back at the beginning of the year.  How I wanted to move outside of my comfort zone and really focus on my friendships.

Shauna has a beautiful habit of opening her home and her kitchen to, it seems, everyone.  She talks about in the first days of her marriage, cramming as many people as she could into their little townhouse for dinner party after dinner party after dinner party.  She encourages women to get over 2 big points of shame for most of us - our bodies, and our homes.

She writes, "But it isn't about perfection, and it isn't about performance.  You'll miss the richest moments in life - the sacred moments when we feel God's grace and presence through the actual faces and hands of the people we love - if you're too scared or too ashamed to open the door."  I LOVE this sentence.  You can count me among the people who try desperately to avoid people just stopping by.  I am always waiting for the next perfect moment to invite people over.  (Well, when we're in a bigger house and have more space.  When we have a bigger table for people to sit around.  When we get a bigger grill to cook on.  When my house is fully unpacked and decorated...)

It might never stop if I keep waiting for perfection.  And I love her sentiment, "What people aren't craving is perfection.  People aren't longing to be impressed; they're longing to feel like they're home.  If you create a space full of love and character and creativity and soul, they'll take off their shoes and curl up with gratitude and rest, no matter how small, no matter how undone, no matter how odd."

My inner conflict is the battle between my extroverted nature and the desire to host and entertain and my self consciousness about never measuring up.  Who am I trying to measure up to, I'm not exactly sure - but all I know is that I never feel like I'm 'there' yet.  Here we are, almost halfway through the year - a good 4 or 5 months since I wrote my intentional friendship post and I have yet to invite a single person for dinner.  We finally have a house big enough to fit people, and a table large enough to linger around - and it's time for me to move past shame and self consciousness and dumb self comparison.  Can't wait to finish the rest of this book!

And of course, I have to share with you the first recipe in the book and the first recipe from the book that I tried.  It's right up my alley using almond meal and maple syrup and it's really easy.  She calls it a blueberry crisp, I'd call it a crumble.  It's full of ripe berries with a crispy, crumbly topping and not overly sweet.  Since the dessert itself is so healthy, we topped it with a large dollop of homemade whipped cream.  Perfection.


Blueberry Crisp

Ingredients
-4 c. blueberries (I used a mixture of blueberries and strawberries) Frozen or fresh, but I prefer fresh

For the topping:
-1 c. old fashioned oats
-1/2 c. raw, unsalted pecans, chopped
-1/2 c. almond meal (you can make this easily by putting raw almonds into your food processor until they turn into fine, flour like consistency)
-1/4 c. maple syrup
-1/4 c. olive oil (I used melted coconut oil)
-1/2 tsp. salt

(I also added some cinnamon, because I love it!)

Directions:
Preheat oven to 350.

Mix topping ingredients.

Pour berries into an 8x8 baking dish, or pie plate.  Layer topping over berries.  Bake at 350 for 35-40 minutes or up to 10 minutes longer if fruit is frozen, until fruit is bubbling and topping is crisp and golden.


You could eat this for breakfast (omitting the whipped cream, of course).  It's absolutely delicious and we ate ours right out of the oven, nice and warm.  Hence the crappy iPhone pictures. 

So - buy the book, make the blueberry crisp and settle in with a hot cup of coffee.  You won't want to put it down!